Welcome to the IB Questionbank. To get started we recommend to read these instructions or click on one of the questions below. If you can’t find the information you are looking for please contact us.
How to activate licences for the online Questionbank
How to get started with the Questionbank as a teacher
How to create and design a test
Customizing, downloading and printing tests
Where to find case studies and markbands
Special instructions for Mathematics Questionbanks
Special instructions for Computer Science Questionbank
Special instructions for Digital Society Questionbank
How to activate licences for the online Questionbank

Once your purchase is successfully completed, you will receive an automated email (shown above) with instructions and the licence key you purchased.
If you bulk purchased licences for multiple schools, please forward the instructions and licenses to the person who will manage the Questionbank for each school. This could be the Diploma Programme coordinator, a teacher or another school staff member.
To activate the licence for your school, follow the link in the email to the page where you can activate your Questionbank licence.
If you don’t have an account with the online Questionbank yet, create a new account by entering your name, email and a password into the form on the right side of the page.
If you already have an account, you can sign in using the form on the left.
Once signed in, select the “Activate licence” button on the home page. On the next screen, enter the licence key from the email. Select “Activate licence”.
How to set up teacher logins
After you have activated the licence, you will be shown the licence details. To set up teacher logins, select the “Teacher logins” button at the top right of the screen.

On the next screen, you can add teacher logins for your school. You can also remove teacher logins on the same form by choosing the “Remove” box next to the teacher’s name. Each licence provides you with a maximum of 10 logins per school. All users on a licence must be affiliated with the same school. If you are purchasing for multiple schools, you must purchase multiple licences.
Select “Update licence” to save your changes.
Once you set up a new teacher login, the app will send an automated email to the teacher with instructions on how to get started.
How to get started with the Questionbank as a teacher
Activation email
In order to use the online Questionbank, activate your account.
Once your coordinator sets up a login for you, you will receive an automated email (shown below) with instructions for signing into the online Questionbank for the first time.
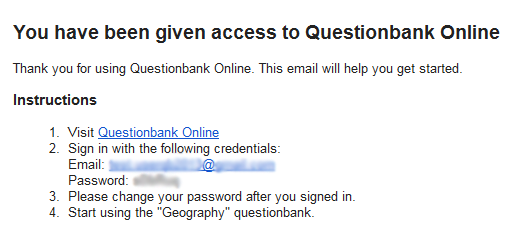
Just follow the link and sign in with the email and password provided.
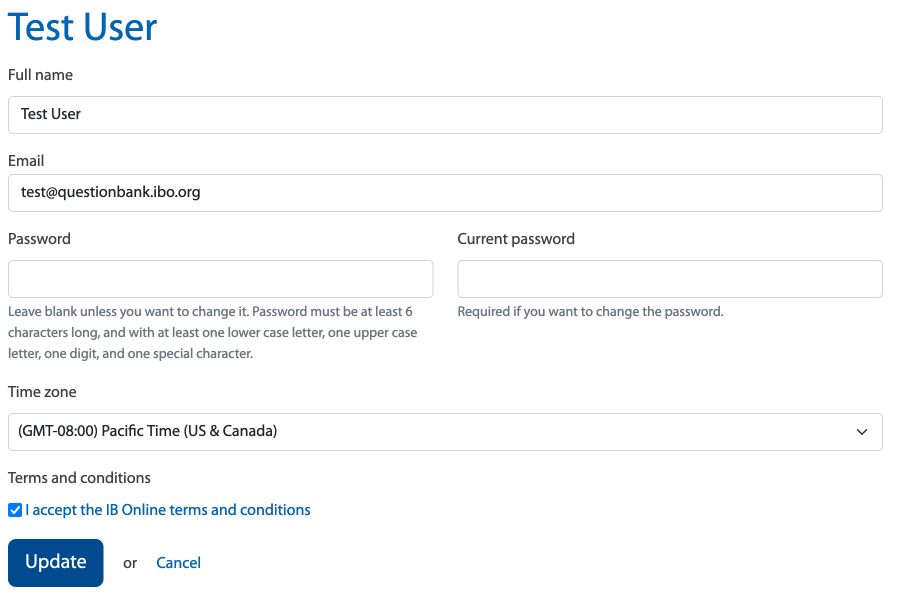
The app will ask you to accept the IB Online terms of service, and you can review your personal information. Select “Update” to proceed.
Now you can start using the online Questionbank.
Changing user account information
In order to change basic account information such as your full name, email address, password and time zone click on your name which appears in the top right corner.
In the screen that appears you will be able to edit and change your user information.
User Dashboard overview
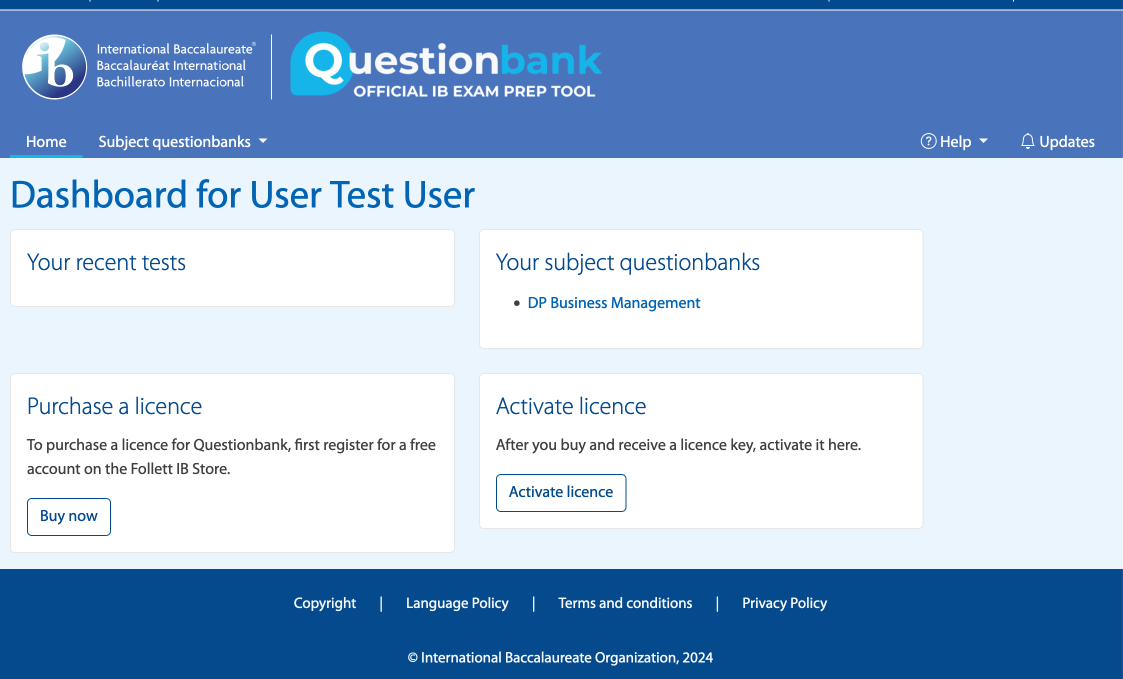
The image above shows the main screen of the Questionbank. In the blue bar across the top of the screen:
- the “Home” link takes you to the Questionbank start page, where you can activate licences or sign in.
- the next link takes you to the Questionbank you just purchased. If you have a license for one Questionbank, the name of that Questionbank will be displayed here. If you have licences for multiple Questionbanks, they will all be listed here.
- select the “Help” link to access video walkthroughs for the online Questionbanks.
- when you select your name, you can edit your personal information, such as your email and password.
- please use the “Sign out” link when you are done working with the online Questionbank.
- 'Your recent tests' - here you find the tests you have most recently worked on
- 'Your subject questionbanks' - Here you'll find a list of you active licenses
- 'Purchase a license' - Use this link to go to Follett Titlewave and purchase or renew a license
- 'Activate a license' - If you have a license number, you can active it here.
How to create and design a test
There are two ways to create a test:
- From the tab 'Test Builder' you can start creating a test. Either choose and existing test or create a new test
- From the 'tab' My tests' click on the 'create a new test' in the right top corner of the page.
Test Builder
With the Test Builder you can build your test by adding and reordering questions. on the left and search for past exam questions on the right. The search options and filters allow you to sort through past examination questions and find relevant questions to drag and drop in your test.
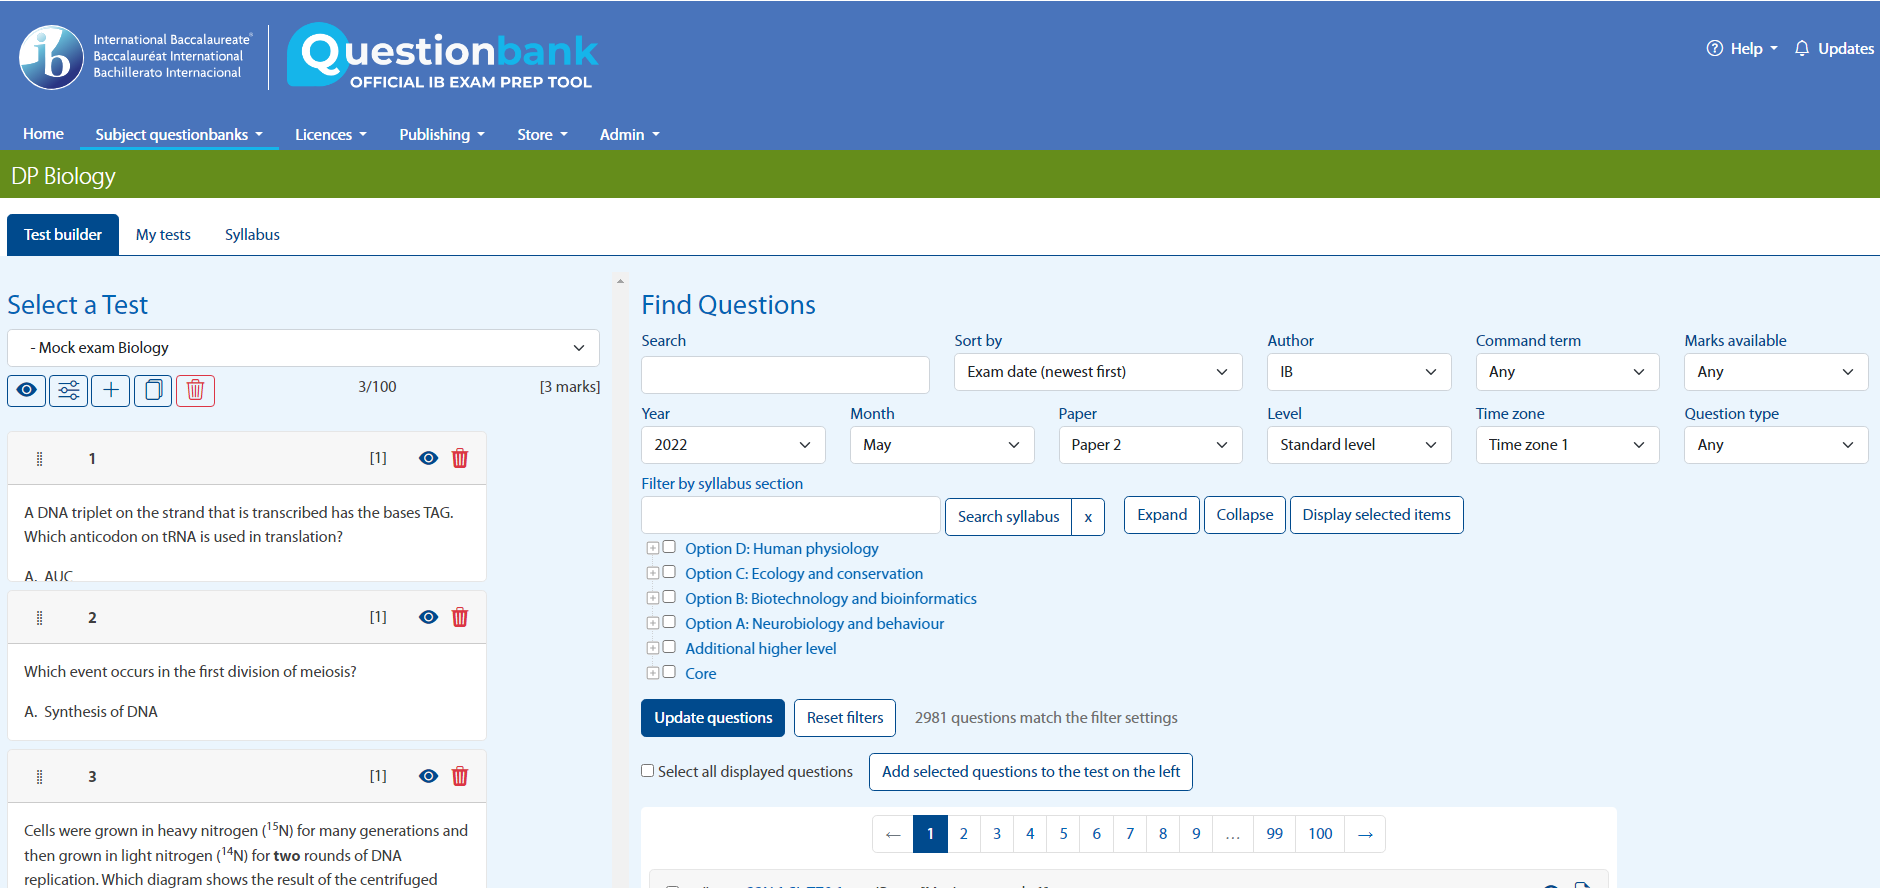
There are a variety of search filters available including:
- year
- month
- paper
- level
- time zone
- question type
- exam date
- marks available
- command term.
It is also possible to filter by questions authored by the IB or questions that you have created.
When you search by the command term the filter will return questions that include that command term as well as questions that are similar in nature.
To filter by syllabus section, use the “Filter by syllabus section” link below the filters. To expand the syllabus sections, click the “+” sign to the left of each topic. To collapse the sections, click the “-” sign. Select the check box(es) next to the syllabus section(s) and click the blue “Update questions” button. To show all syllabus sections, click the “Expand” button. To hide the syllabus sections, click the “Collapse” button.
You can also search the Questionbank by typing a search term into the search box and hitting enter or clicking the blue "Update questions" button. You will see a search spinner while the Questionbank is loading the search results.
Icons in the Test Builder
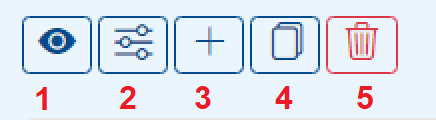
- Preview your test
- Test Dashboard - This will open the Test dashboard where you can export the test to PDF or DOCX and you can manage how you want the test displayed.
- Create a new test
- Duplicate the test
- Delete a test
Customizing, downloading and printing tests
Test Dashboard
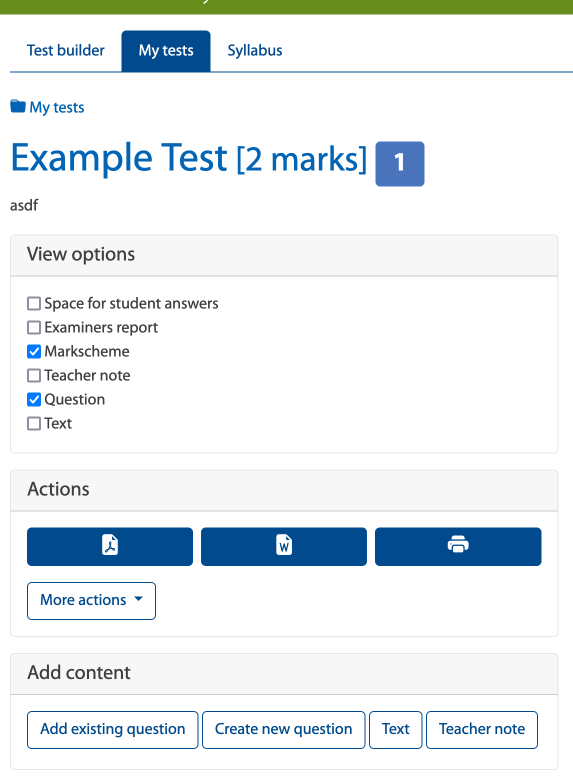
On the Test dashboard you can manage how you want your test to look like and export it to PDF and Word. Do you want to include student answer space, or only the markschemes and examiner comments, you can edit these options here on the Test dashboard. From here you can also add questions from the Questionbank library or create your own questions.
Note: In order to go back to the Test Builder, Click on 'Add existing question'.
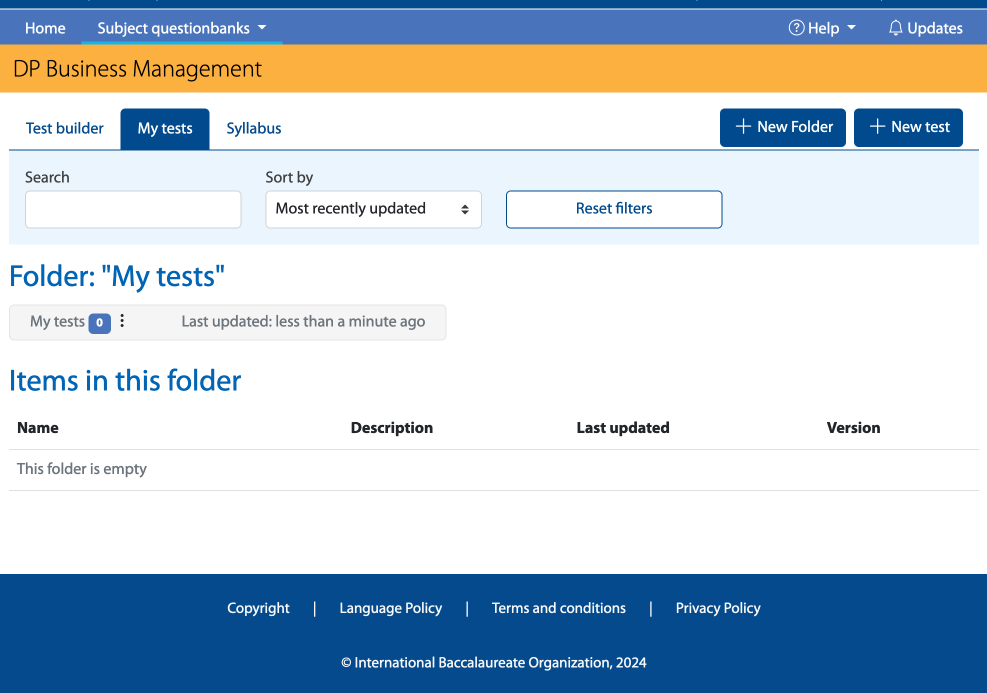
How to organize your tests
You can organize your tests in folders. Click on 'My tests' and from that page you can create new folders and move tests into the folder of your choice.
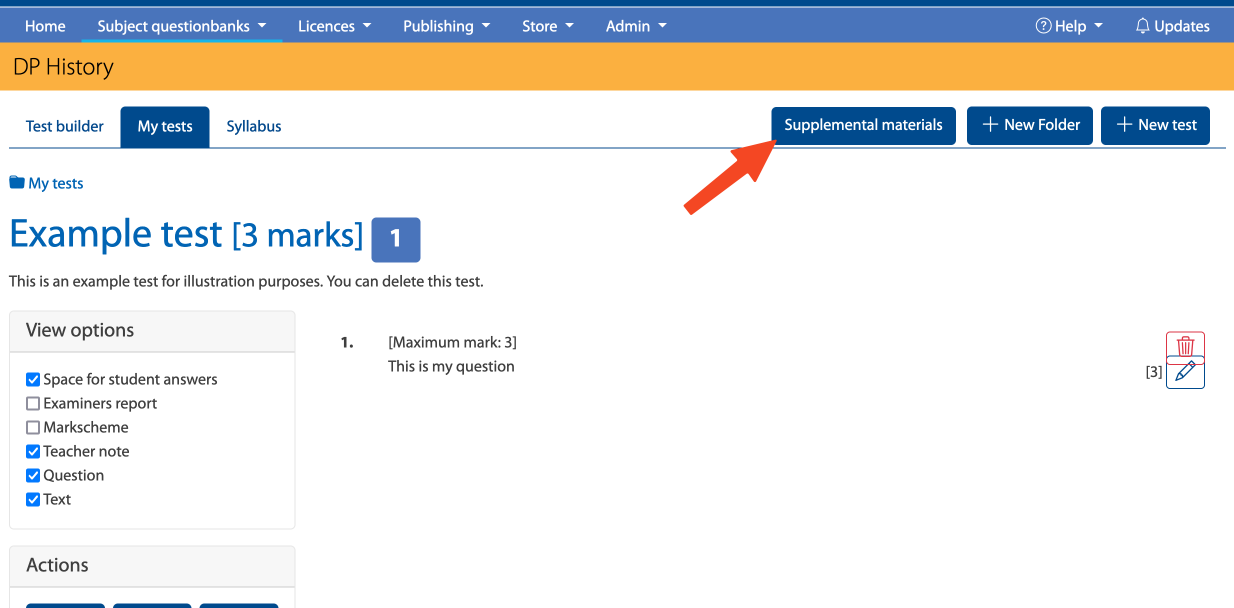
Where to find case studies and markbands
Supplemental materials such as case studies and markbands can be found under My tests>Supplemental materials.
Special instructions for Mathematics Questionbanks
What are "Example" questions?
There are two types of “Example" questions:
1. Questions that are not from a live IB exam.
These questions have been written to provide practice for syllabus topics with limited or no coverage in previous live exams. They have been checked for accuracy but have not been through the rigorous level of review conducted on live exam questions.
2. Questions from exams for a much older syllabus cycle.
These questions from pre-2007 exams have been included for select topics which have limited or no relevant questions in recent exams. They have been identified by subject matter experts as suitable to use as practice, although they may contain some differences in marking or structure.
What do the codes for each question mean?
The codes indicate the source exam paper and question number:
[year and month of original exam].[paper number].[level].[time zone].[original Maths course and question number]
If a letter (F/H/S/T) appears before the question number, this indicates that the question was taken from a previous Maths course:
F = Further Maths
H = Maths HL
S = Maths SL
T = Maths Studies
Examples:
19M.1.SL.TZ1.S_10 is from 2019 May Paper 1 time zone 1, Maths SL, question 10
16M.2.SL.TZ2.T_5a is from 2016 May Paper 2 time zone 2, Maths Studies, question 5a
Maths HL questions include an additional code to identify the Paper 3 Option:
ca: calculus
dm: discrete mathematics
srg: sets, relations and groups
sp: statistics and probability
Examples:
19M.3.AHL.TZ0.Hca_1a is from 2019 May Paper 3 Maths Higher Level (calculus), question 1a
15N.3.AHL.TZ0.Hsp_3 is from 2015 November Paper 3 Maths Higher Level (statistics and probability), question 3
Special instructions for Computer Science Questionbank
How can I use past Paper 3 questions to develop new content for students?
HL Paper 3 and the associated Case Study was developed as “an opportunity to keep the course abreast of current technology by introducing new technical concepts or issues requiring a more in-depth investigation than that required in the rest of the course” (Guide, page 73). This accounts for the absence of syllabus tags that relate to the topics in the Computer Science Guide. The questions for HL Paper 3 have been provided so that teachers can look for common themes. For example: Which questions can be explicitly linked to the additional terminology at the end of the Case Study? Which command terms are used for Question 1 or Question 3? Do all question 4s follow an identical format?
Special instructions for Digital Society Questionbank
How can the Digital Society Questionbank help me prepare to teach the new course?
Guidance on using the Questionbank is provided in the document “General guidance and markbands,” which can be found under the “Your tests” tab > Supplemental materials.
Where can I find pre-release statements for Paper 3 and markbands?
These can be found under the “Your tests” tab > Supplemental materials.